|
|
Contextual Learning Portal Grinding A 1-2-3 Block
Basics- Project TitleGrinding A 1-2-3 Block
- Employer SiteRazor Tool, Woburn MA
- Submitted By (Teacher Name)Corey Dolan
- SchoolMinuteman
- Brief Description and RationaleThis lesson will teach students the basics of grinding using a precision surface grinder. Surface grinding requires tight tolerance work. In order to start this lesson students should be able to hold +- 0.003 tolerances on a milling machine. Like anything, grinding is a skill that is learned. This lesson will certainly test students attention to detail and their ability to maintain tight tolerances. Both of these skills are very important to employers. Students will learn how to test their patience with this lesson.
- Grade Level12 (High School Seniors)
- Materials / Resources4140 Steel Rectangle (1.125 X 2.125 X 3.125)
Vertical milling machine
Endmills
Engraving Tool
Milling machine vise
Surface grinder and appropriate grinding wheels (Aluminum Oxide Grinding Wheels)
Magnetic chuck
Sharpie
Tenths dial indicator
Parallels
- Duration of lesson4 Days (5.5 Hours a day for a total of 22 Hours)
- Key Vocabulary / Word WallTenth- This is equivalent to 0.0001
Surface Grinder A surface grinder uses an abrasive wheel to create an ultra-flat and super smooth surface.
Magnetic Chuck- The work holding device we are using on our surface grinder. This has a large flat surface that can be magnetized and de-magnetized using a large lever on the side. This is a super powerful magnet that is incredibly dangerous if not used properly.
Tenths Dial Indicator This is like all other indicators we use in the shop daily except it is 10 times more sensitive. This is to be treated with care and respect as it is not nearly as durable as the standard ones. This indicator is to be used ONLY on the surface grinder and nowhere else.
- Pre-Requisite KnowledgeBasic milling operations
Basic inspection tool knowledge
Intermediate to advanced machine shop safety
Basic materials knowledge
- Strategies to promote equity1. Use classroom and shop space dynamically Do not teach entirely from the front of the class. Use classroom setup to promote more discussion, moving around will reduce the teacher-student hierarchy and will lead to more meaningful discussion.
2. Do not try to do too much at once How do you eat an elephant? One bite at a time. Students can become overwhelmed very easily. Try to break lessons into small bite size pieces that allow students to discuss and ask questions between bites
- Instructional ObjectivesDemonstrate the ability to use a milling machine in a safe manner a steel rectangle to a specified tolerance. Demonstrate the ability to safely mount a grinding wheel to a surface grinder, True the wheel, and safely use a surface grinder. Produce a 1X2X3 steel block that is accurate within a specified tolerance.
Lesson #1 | Intro to surface grinding- Lesson Plan 1 TopicIntro to surface grinding
- Lesson plan 1 objectivesThe assignment will get students familiar with the grinding process, the surface grinder, and all the new vocabulary. Teach grinder safety, administer a safety test that requires a 100% to pass.
- Anticipatory set or lesson opening (to activate students` prior learning or draw student interest or involvement)Watch attached video from 4:40 to 5:40 and talk to students about what they think might be going on. Direct conversations towards things like possible depth of cut, cutting speed, and safety.
https://www.youtube.com/watch?v=7FwL55ErfDI
- Direct InstructionAfter the class has completed the labeling a surface grinder assignment, students will take turns calling out and naming the various parts as well as grading their own work as we progress through all the parts. Assignment will then be collected for grading at a later time. Instructor will then begin talking about safety and basic machine operation. After the demonstration, the instructor will then quickly grind a small piece of steel to show students in person grinding action. Wheel will then be removed for guided practice
-

- Guided Practice *With the grinding wheel removed* Students will play a bop it like game with the instructor. The instructor will say things like move the Z-axis negative .050 inches or turn on the spindle (!this is why the wheel is removed!). Each student will be evaluated on their ability to make decisions and move the machine in each direction quickly and efficiently.
- Independent Practice/Differentiated ActivitiesStudents that require or request additional information will be given the answer key for the previous assignment, as well as extra time to perform the tasks of moving axiss and turning on various functions.
- Reflection on Employability SkillsResponsibility Having students grade their own work will teach them that they need to be responsible for themselves regardless of the outcome.
Adaptability This will be the first time these students will be using this machine. This machine operates like others, but they must adapt to a few small changes.
Communication playing the bop it style game with rapid-fire questions and an action being the response will teach the kids that they must listen accurately and be able to respond in the appropriate manner.
- Lesson ClosureWe will end the lesson by talking about the similarities and differences between a surface grinder and other pieces of equipment we have used in the past. End the conversation with a question that they respond to in their notebooks (response will be read at another time). The question being What is the minimum and maximum amount of material do you need on your work piece to accurately produce a part on the surface grinder?
- Summative/end of lesson assessmentA surface grinder safety test will be taken to end this lesson (attached file)
- References / Resources / Teacher PreparationGrinder information sheet is attached.
-
Web Link: Surface Grinder Info Web Link: More Surface Grinder Info
Lesson #2 | Grinding wheel types and grinding wheel selection. What materials can be ground and what materials cannot?- Lesson Plan 2 TopicGrinding wheel types and grinding wheel selection. What materials can be ground and what materials cannot?
- Lesson Plan 2 ObjectivesInform students what materials can be safely surface ground in our shop. Educate students on grinding wheel selection and safe grinding practices.
- Anticipatory set or lesson opening (to activate students` prior learning or draw student interest or involvement)Set up a table with several different materials (both metals and non-metals) and a magnet. Ask students what materials they think are magnetic and what they do not think are magnetic. (I know this sounds like an elementary school assignment, but my kids would love this. They will pay attention because they will think it is so silly were learning about magnetic materials). After they get a good laugh out of the silly demonstration, explain to them that the only method we have of holding work pieces onto our machine is the magnetic chuck.
- Direct InstructionBegin instruction by talking about ferrous and non-ferrous metals, talk about magnetic chuck and its power. After magnet discussion show video on Scooping ice cream to regain attention (https://www.shutterstock.com/video/clip-28856866-slow-motion-shot-ice-cream-being-scooped) Explain to students that this is exactly how an endmill forms chips. Next show video of cheese grater (https://www.shutterstock.com/video/clip-1026671288-slow-motion-cheese-grater) and begin discussion on how both are technically performing a cut but how drastically different they are. Use example of ice cream with a cheese grater and cheese with an ice cream scoop. Bring a surface grinder wheel into the classroom and ask students how they think it cuts. (it cuts more like a cheese grater than an ice cream scoop-slow and accurate) Take notes on wheel terminology and wheel types. (attached notes)
-
View/Download File: Grinding Wheel Notes - How to Read a Wheel - Guided PracticeStudents will be given a worksheet (attached) and as a class, complete the assignment.
-
View/Download File: /project764_347/Grinding_Wheel_End_of_Discussion_Work.docx - Independent Practice/Differentiated ActivitiesStudents that require/request copies of notes will be provided with them.
Students will be given 10 minutes to walk around the shop and find ground surfaces. (there are more than 15). Each student must determine (to the best of their ability) what material the surface is, and what grinding wheel THEY would choose to grind that surface. This will lead into lesson closure discussion.
-
View/Download File: Student notes - Reflection on Employability SkillsStudents will also be required to articulate what grinding wheels they would need. This is a conversation that they may need to have with their employer in the future.
- Lesson ClosureWe will end this lesson by meeting back in the classroom and discussing what everyone found to grind in the shop and what they think the appropriate wheels for that specific application are. As a class, we will discuss if each students choice in grinding wheel is correct or incorrect and why that may be the case.
- Summative/end of lesson assessmentEach student will be graded on their ability to select a ground item from around the shop and their ability to describe what wheel would be needed to perform a surface grinding operation on that material. Grades will be given 1 out of 10
- References / Resources / Teacher PreparationHow to read a grinding wheel paperwork is attached
-
View/Download File: /project764_347/Grinding_Wheel_Teacher_Notes_READING_A_WHEEL_1.docx
Lesson #3 | Rough Machining a 1-2-3 Block- Lesson Plan 3 TopicRough Machining a 1-2-3 Block
- Lesson Plan 3 ObjectivesGet students to understand the tolerance we can achieve with a surface grinder. By the end of this lesson students should have a 1-2-3 block that is roughed machined .003-.005 over sized and square within .002.
- Anticipatory set or lesson opening (to activate students` prior learning or draw student interest or involvement)Begin the lesson by having everyone go out into the shop and grab their dial test indicators (I have had great success when I start lessons by having kids get items from the shop). This is a tool that these students have used 100s of times by this point in their career and they have a perfect understanding of how it works. Introduce the Tenths Indicator to the class. The tenths indicator is 10X more accurate than the dial indicator the students are currently holding. Pass this indicator around and let the students spend time exploring exactly how sensitive this item is. After everyone has a turn experiencing the extreme sensitivity that the tenths indicator provides, explain to the class that the surface grinder works in .0001 increments and it is just as sensitive of a machine as the tenths indicator.
- Direct InstructionBegin instruction by talking about how accurate we think we can mill a block (realistically it is +-.002). After that discussion has fizzled out, guide discussion towards how much material can be removed per pass on the surface grinder and how oversized we think out blocks need to be before we are set to start grinding them. End conversation by telling students they must mill a supplied block of steel to .003 over sized.
- Guided PracticeStudents will be given a bar of material (12L14 Steel rectangle extrusion measuring 1.125X2.125) they must then use the band saw to cut a length to 3.125. Students will then go to their HAAS mills and face off one of the band saw cut sides of the stock.
- Independent Practice/Differentiated ActivitiesStudents will now be given the task of bringing their steel rectangle to the tolerances provided on the attached blueprint.
***Second attachment is a "SOLIDWORKS" file that can only be opened using solidworks. Solidworks is an industry standard 3d modeling software. *** -
View/Download File: /project764_347/Rough_123_Block_DWG.PDF View/Download File: /project764_347/Rough_123_Block_DWG.SLDDRW - Reflection on Employability SkillsLetting students finish part of this project on their own will force them to think independently. They will also need to plan their operations. This will force them to plan ahead.
- Lesson ClosureThis lesson will end by having all students evaluate their own oversized 1-2-3 block on the height gauge. end class with a discussion of how machining their blocks went, what worked, what didn`t work, and what we would do differently next time.
- Summative/end of lesson assessmentEach students rough machined block will be evaluated at the height gauge and they will be graded accordingly.
Lesson #4 | Safe and proper grinding wheel setup and dressing a grinding wheel. - Lesson Plan 4 TopicSafe and proper grinding wheel setup and dressing a grinding wheel.
-
Web Link: Ring Testing Grinding Wheels Web Link: Ring Testing Grinding Wheels - Lesson Plan 4 ObjectivesHave students be able to select, mount, and dress a grinding wheel to industry standards.
- Anticipatory set or lesson opening (to activate students` prior learning or draw student interest or involvement)Display attached image onto screen. Ask students what they think happened. What actually happened is a grinding wheel explosion. Explain to the students the dangers of improper wheel setup and the care involved in what we`re going to be doing.
-

- Direct InstructionWatch video and pass around several wheels with both cracks and no cracks. have students try the ring test on their own. After all wheels have been determined to either be good or bad, bring the class out to the surface grinder and discuss safe mounting and dismounting of wheels. When a good wheel is mounted, show the class how to "dress" by giving an in-depth demonstration
- Guided PracticeGuided Practice is incorporated into direct instruction for this lesson.
- Independent Practice/Differentiated ActivitiesEach student will be required to ring test, mount, and dress a grinding wheel. Students that feel unsafe or need additional teacher assistance will be provided with that.
- Reflection on Employability SkillsAccording to our board members, one of the big skills missing from kids today is the ability to say I dont know what I am doing, can you please help me. I have often heard that the mark of ones intelligence is the ability to know what you know and know what you do not. This will be the first time students are going to be mounting and dressing a grinding wheel, students should have several questions and it is a complicated enough machine that they will not be able to guess their way through it.
- Lesson ClosureThe instructor will mount and dress the appropriate wheel for grinding 12L14 Steel in front of the class to reinforce what they have learned. Quickly go over all the handles, knobs and functions of the surface grinder in preparation for the final lesson.
- Summative/end of lesson assessmentStudents will be independently evaluated on their performance during independent practice.
- References / Resources / Teacher Preparation"Ring Testing Grinding Wheels" YouTube, Uploaded by Tom Fischer, January 5th, 2016 - https://www.youtube.com/watch?v=xXyVP0wzd9I
Lesson #5 | Finish Grinding a 1-2-3 block
!!!AT THIS POINT EACH STUDENT SHOULD HAVE A ROUGHED 1-2-3 BLOCK THAT IS READY TO BE SURFACE GROUND!!!- Lesson Plan 5 TopicFinish Grinding a 1-2-3 block
!!!AT THIS POINT EACH STUDENT SHOULD HAVE A ROUGHED 1-2-3 BLOCK THAT IS READY TO BE SURFACE GROUND!!! - Lesson Plan 5 ObjectivesStudents should finish this lesson with a complete, within tolerance, Steel 1-2-3 block that they can use throughout their career.
- Anticipatory set or lesson opening (to activate students` prior learning or draw student interest or involvement)Begin lesson by watching This Old Tony video on surface grinding (Attached)
- Direct InstructionStudents will be given a demonstration on proper surface grinding. Instructor will walk students through every step of grinding a demo 1-2-3 block.
- Guided PracticeEach Student will grind two parallel faces with the instructors guidance. These faces will be checked for flatness and parallelism on the height gauge.
- Independent Practice/Differentiated ActivitiesEach student will grind the remaining four faces of their 1-2-3 block to meet the dimensions of the provided drawing. Each students work will be evaluated on the height gauge, as well as any other shop measurement tools that are available to them.
-
View/Download File: /project764_347/Finish_123_Block_DWG.SLDDRW View/Download File: /project764_347/Rough_123_Block_DWG.PDF - Reflection on Employability SkillsStudents will be required to have extreme attention to detail during the final grinding process.
- Lesson ClosureLesson will end with a class discussion of what went well, what worked and what didnt, and things we would do differently next time
- Summative/end of lesson assessmentIndividual student work will be measured using shop tools and graded according to attached rubric.
-
View/Download File: Rubric
Recommended Strategies / Instructional Techniques - Reading StrategiesUsing prior knowledge - Students will be using their prior knowledge when reading about a surface grinder to understand the similarities and differences between the machines they have used and this machine that they have not.
Questioning - Engage students in question generating dialogue - Multimedia/Visual Strategy (f.e. slides)Youtube "surface grinder" and let kids pick video within reason. <---this engages the kids
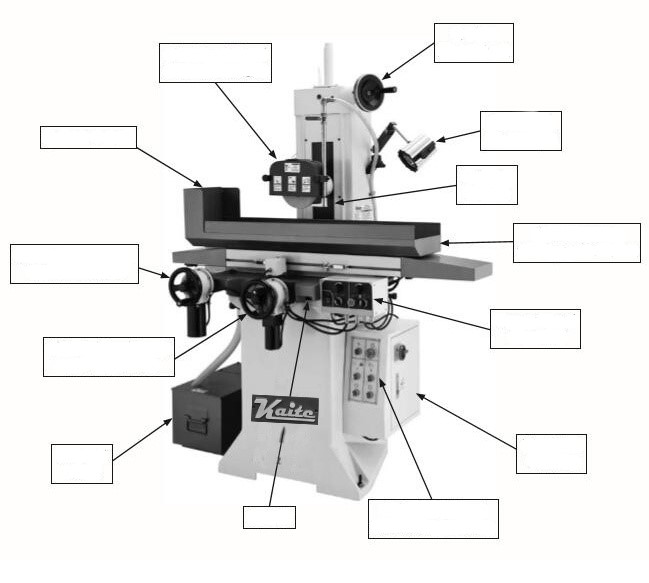
Visual description labeling of a surface grinder diagram.
This Old Tony surface grinding video - Graphic organizers or handoutsSee Attached
-
View/Download File: /project764_347/Surface_Grinder_Parts_ANS_KEY_.docx View/Download File: /project764_347/Surface_Grinder_Parts_handout.docx - Writing StrategiesMechanism Description - At the beginning of class, students will be asked to write a brief description of what they think a "surface grinder" does and how it works. The same will be done at the end of the lesson to show improvement in their understanding.
Process description- Students will be required to write a "reflection" piece on this project for their portfolio. This reflection will require them to briefly describe the entire process they went through. - Speaking and Listening StrategiesTalk about new words - There are several new terms that are required to be understood before we start this lesson. The new vocabulary will all be placed on the board and we will define them as a class, forcing students to both speak and listen to define all the terms.
The "bop it" style game where an item or action is called out in lesson 1 Will require that students listen and react in an appropriate manner. - Family: Any opportunities to involve parent/guardians and other family members in this project?Students will have the opportunity to bring shop equipment home in order to have their friends and family measure their 1-2-3 block using different methods. Individuals can use a tape measure, ruler, dial caliper, and micrometer to see what measures the most accurate and see how close the block is to the actual provided drawings tolerances.
- Virtual/Remote Teaching StrategyThis project is something that requires specific equipment to complete. Without in-person attendance, this project would be impossible
Activity SheetsName_______________________ Date______________
*Indicates correct answer
Grinding Wheels Assignment
- What is the most common type of grain type we will be using in the shop?
- AZ *
- GC (explain how GC stands for Green Silicon Carbide and we are NOT cutting carbide *DANGER*)
- What method of work holding are we going to use on the surface grinder?
- Magnetic Chuck*
- Hands
- Clamps
- Vises
- What shape (also referred to as profile) will all of our grinding wheels be
- Type 13 -Saucer
- Type 5 – Recessed one side
- Type 1 – Straight*
- Type 20 – Relieved one side
- A grinding wheel is a/an__________ type of cutting (abrasive)
- When choosing a grinding wheel for grinding mild steel, what properties are you looking for in your grinding wheel? List as many as possible
- Parts of a Surface Grinder
Name:___________________________ Date:____________
Surface Grinder Anatomy
After the instructor give you a tour of the surface grinder, please label as many parts of this machine as
you can.

-
Subject = Mathematics, Science, CVTE | Grade Level = HS | Time Period = School Year | Program/Funding = | Externships-2020 |
Direct website link to this project: http://ContextualLearningPortal.org/contextual.asp?projectnumber=764.347
|